

【教學/測試】測試 SX1272 LoRa Module | SX1272 LoRa Module 和 Waspmote Gateway SX1272 LoRa module 測試
Last Updated on 2022 年 8 月 13 日 by 小編
LoRa(Long Range)是法國公司 Cycleo 設計,而 Semtech 在 2012 將其收購。本篇文章將介紹如何 測試 SX1272 LoRa Module。
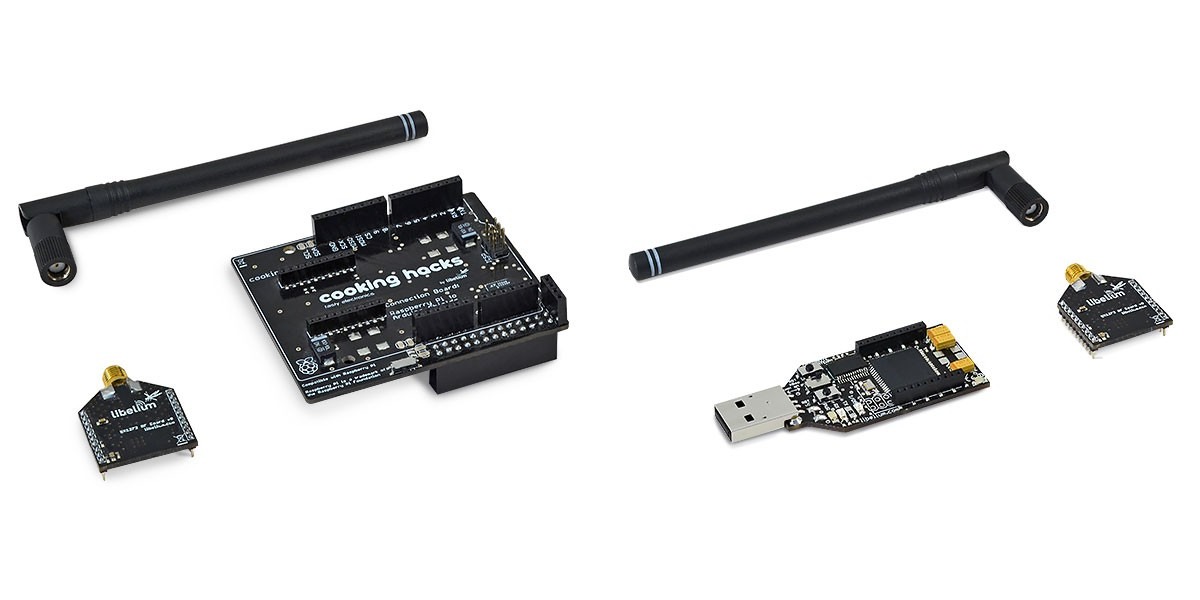
本文以 cooking hacks 出的 SX1272 LoRa module + LoRa shield(圖左) 和 Waspmote Gateway SX1272 LoRa module(圖右) 做測試。
內容目錄
前言
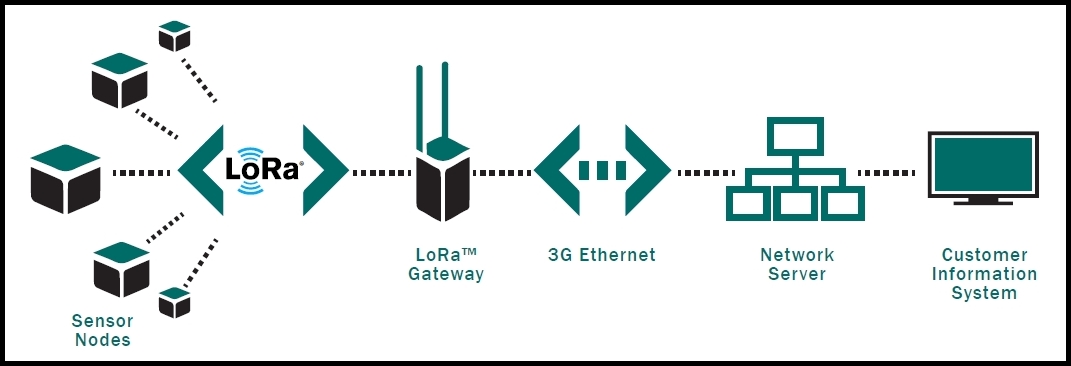
要使用 LoRa 通訊,最簡單的方式就是將 LoRa module 設定相同的 channel,這樣在相同 channel 的節點就可以互相收送資料,這是 P2P 的拓撲。
如果在 P2P 模式下增加 LoRa Gateway,一方面可以讓拓撲轉變星狀,能更有效的收集資訊,另一方面也可以整合多種裝置與通訊協定,延伸資訊傳遞的方式。

設定 LoRa Gateway
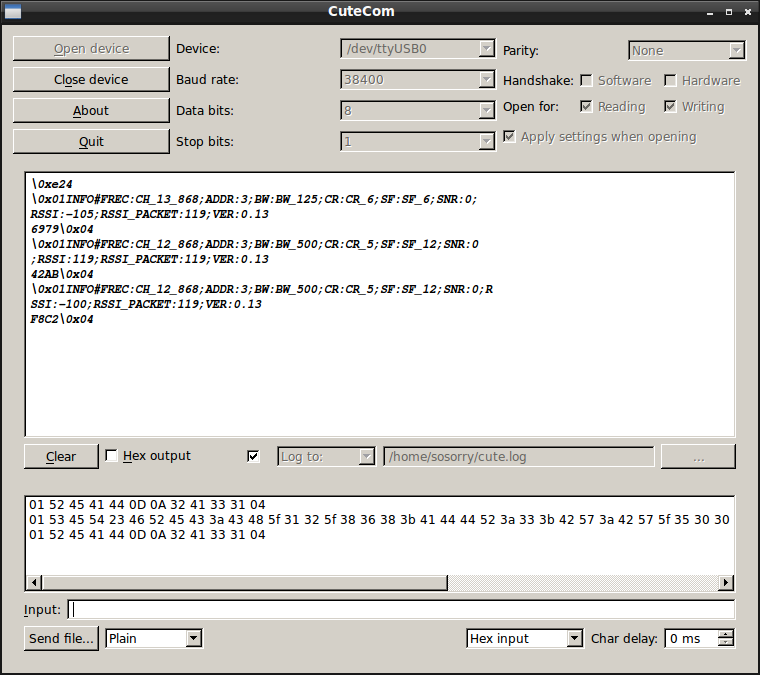
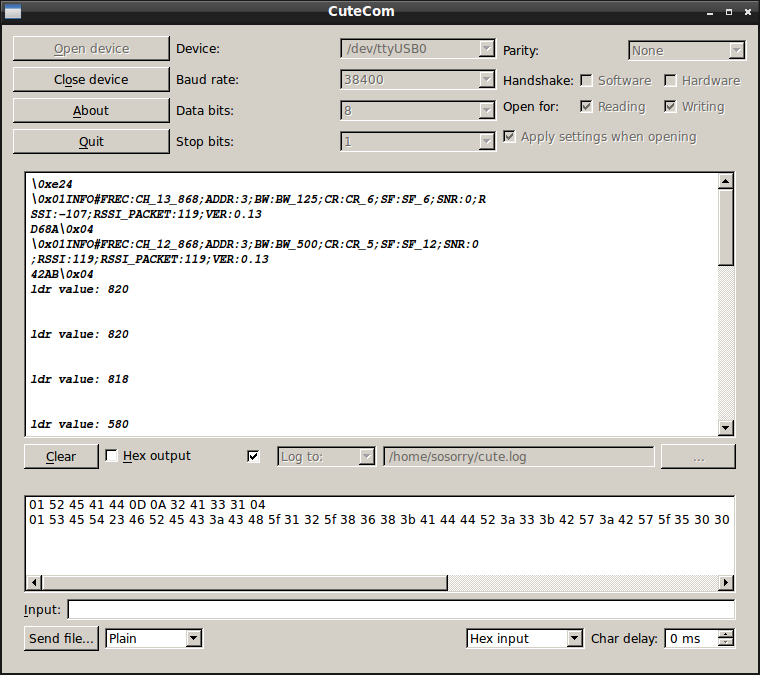
我們可使用任意的終端機軟體(例如 CuteCom)和 LoRa Gateway 溝通。要注意連線的參數:
- Baudrate: 38400
- 8 Data bits
- No parity
- 1 Stop bit
如果裝置開啟成功,我們就可以開始和 LoRa Gateway 進行互動式的溝通,傳輸的訊息都是 16 進位(hexadecimal)的格式。
每一個訊息稱為 frame,有固定的格式,至少五個部份為:
- SOH (Start of Header – ASCII 0×01),起始通訊符號。
- DATA(Command or return message),實際送出或接收到的資料。
- CR+LF (Carry return + line feed -ASCII 0x0D and 0x0A),換行符號。
- CRC(CRC16-Modbus),錯誤檢查。
- EOT (End of Transmission – ASCII 0×04),結束通訊符號。
所有命令都需要轉成 16 進位發送,可以透過線上的工具做轉換。
而 CRC 是將 DATA 進行 CRC-16(Modbus) 運算後的值,可以透過線上的工具計算結果。
實際舉例,我們想取得目前 LoRa Gateway 的設定值,要傳送的 frame 值會是這樣:
01 52 45 41 44 0D 0A 32 41 33 31 04
其中,01 就是 SOH。52 45 41 44 就是 READ 從 ASCII 轉成 HEX 的值。0D 0A 是 CR+LF。32 41 33 31 是用 52 45 41 44 進行 CRC 的運算結果,一樣也是要轉成 HEX。04 就是 EOT。
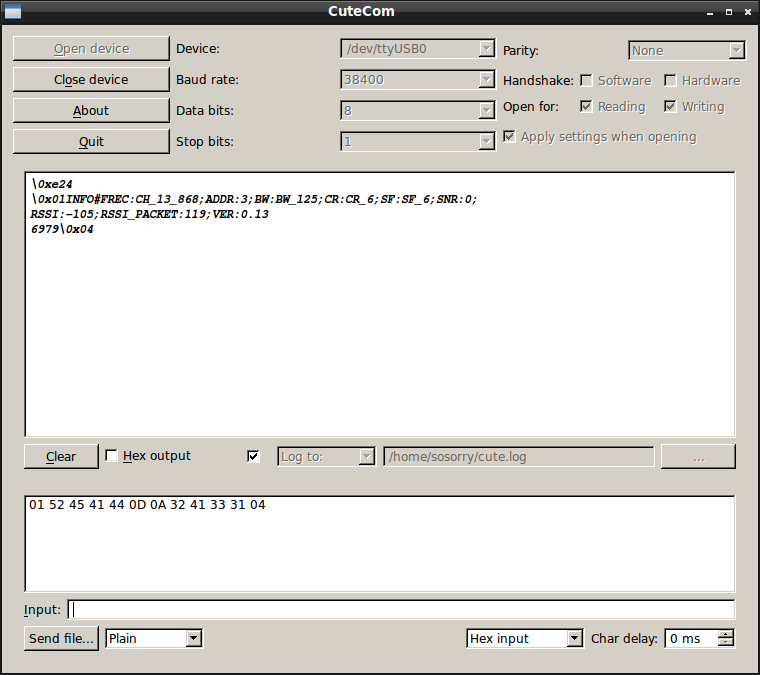
在輸入時注意要選擇 Hex input,而 Char delay 要選擇 0 ms。
回傳的結果為:
\0x01INFO#FREC:CH_12_868;ADDR:1;BW:BW_125;CR:CR_5;SF:SF_12;SNR:0;RSSI:-105;RSSI_PACKET:119;VER:0.13
6979\0x04
因為我們在 CuteCom 沒有勾選 Hex output,因此是用 ASCII 顯示結果,回傳訊息一樣是 [SOH]DATA[CR+LF]CRC[EOT] 的形式。
- 開頭是
0x01就是SOH。 - DATA 部份為
INFO#FREC:CH_12_868;ADDR:1;BW:BW_125;CR:CR_5;SF:SF_12;SNR:0;RSSI:-105;RSSI_PACKET:119;VER:0.13
- 其中
INFO,表示目前的設定,用#分隔後面的資料。而資料格式為 name:value,資料間用;分隔。 0D 0A是CR+LF。6979就是將 DATA 進行 CRC 的 ASCII 運算結果,要再轉成 HEX。- 結尾
0x04就是EOT。
參數說明如下:
- FREC (frequency and channel): CH_X_Y where X is the channel and Y the frequency band. Bands allowed are 900 and 868 (MHz). Channels allowed are 10 to 17 for 868 MHz band and 00 to 12 for 900 MHz band.
- ADDR (address): Number between 1 and 255.
- BW (Bandwidth): BW_X where X can be 125, 250 or 500 KHz
- CR (coding rate): CR_X where X is a number between 5 and 8.
如果我們想將 channel 改為 12、address 改為 3、bandwidth 改成 500KHz、coding rate 改成 5,這樣的 frame 應該會長這樣(DATA 和 CRC 先用 ASCII 顯示):
- SOH = 0x01
- DATA = SET#FREC:CH_12_868;ADDR:3;BW:BW_500;CR:CR_5;SF:SF_12
- CR+LF = 0x0D 0x0A
- CRC = 79CA
- EOT = 0x04
轉成 HEX 結果:
01 53 45 54 23 46 52 45 43 3a 43 48 5f 31 32 5f 38 36 38 3b 41 44 44 52 3a 33 3b 42 57 3a 42 57 5f 35 30 30 3b 43 52 3a 43 52 5f 35 3b 53 46 3a 53 46 5f 31 32 0d 0a 37 39 43 41 04
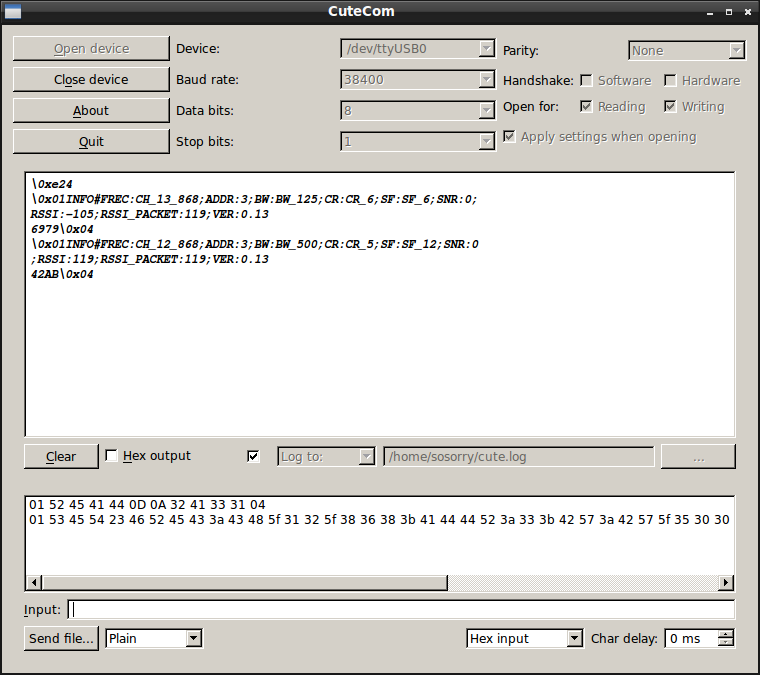
可以看到回傳結果就是我們剛剛的設定值,只是 SET 改成 INFO。
我們也可以再送一次 READ 確認結果。
會設定 LoRa Gateway 以後,可以試試看和 LoRa module 通訊,例如將光敏電阻的值從 LoRa module 送到 LoRa Gateway。
測試 SX1272 LoRa Module
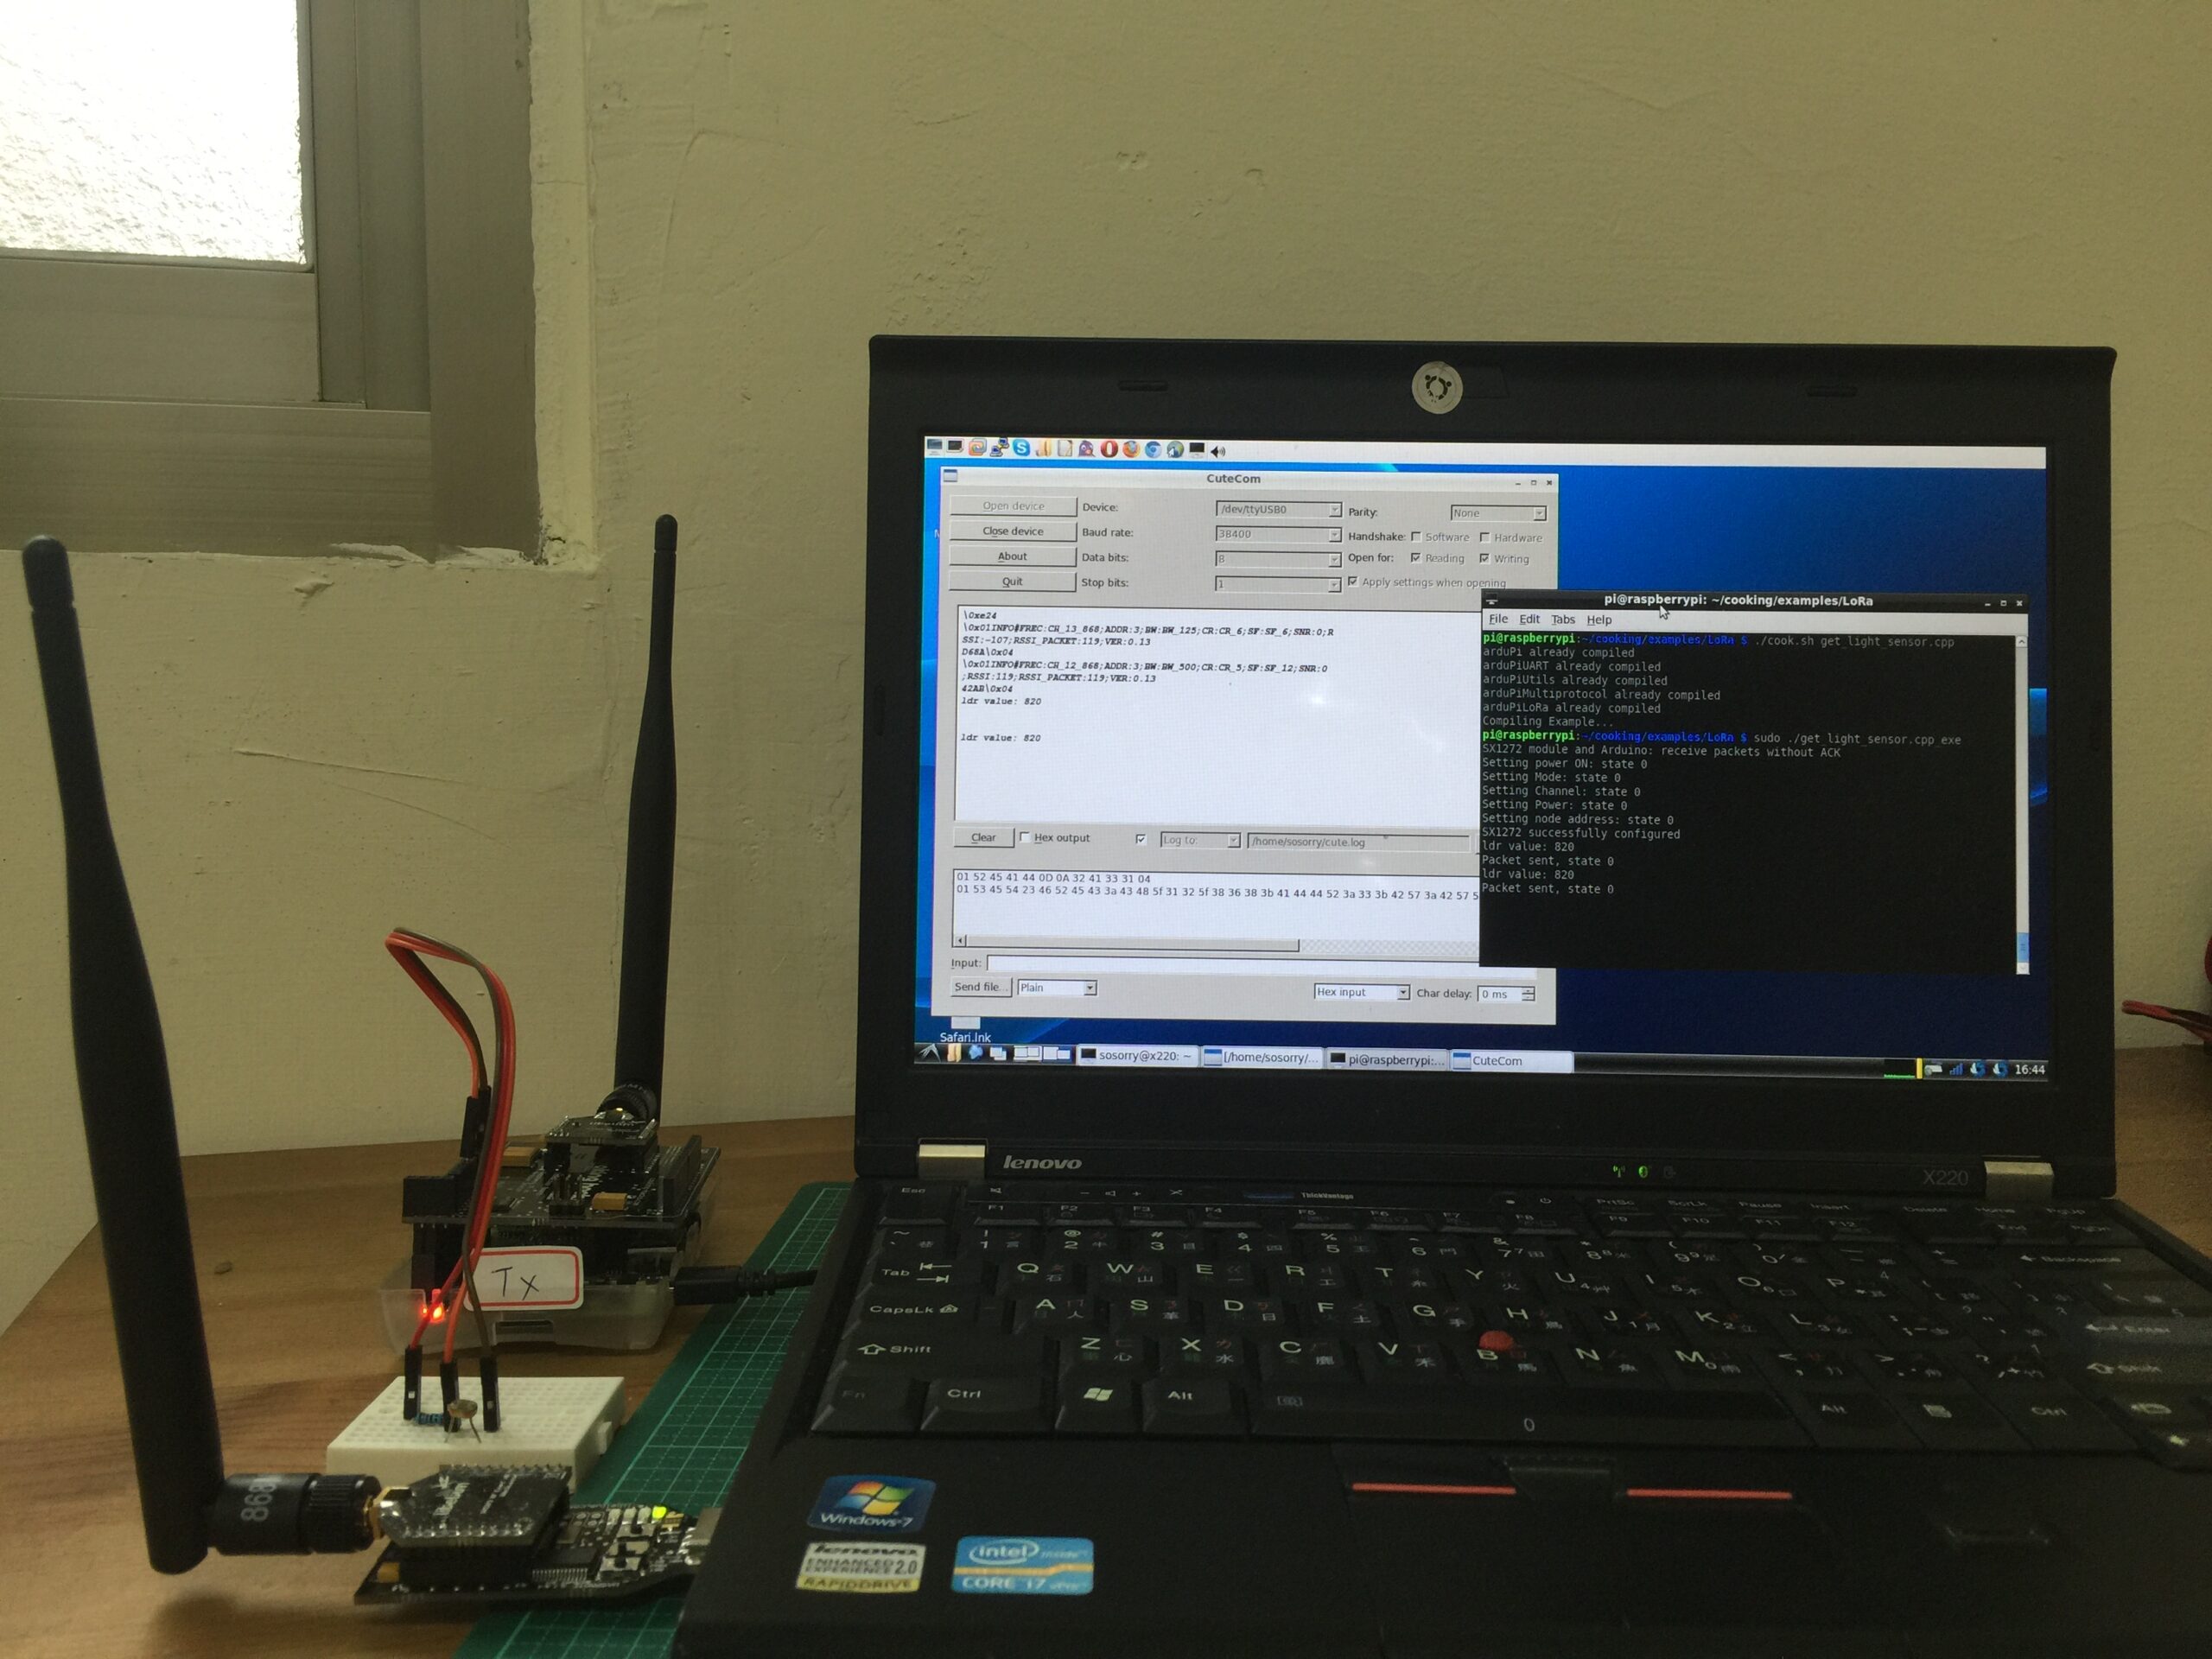
Gateway:
筆記型電腦 + Waspmote Gateway SX1272 LoRa module。在該電腦上安裝 CuteCom
Node:
Raspberry Pi 2 + SX1272 LoRa Shield + LoRa module。在 Pi 上安裝 ArduPi library 和 SX1272 Libraries。
感測器為光敏電阻與 10K 電阻串連,並分別接到 Raspberry Pi LoRa Shield 的 5V、GND 和 A1。
此一範例程式是修改自 How to Send Sensor Data Using LoRa Extreme Range Connectivity Kit。
/* * LoRa 868 / 915MHz SX1272 Module * * Copyright (C) Libelium Comunicaciones Distribuidas S.L. * http://www.libelium.com * * This program is free software: you can redistribute it and/or modify * it under the terms of the GNU General Public License as published by * the Free Software Foundation, either version 3 of the License, or * (at your option) any later version. * * This program is distributed in the hope that it will be useful, * but WITHOUT ANY WARRANTY; without even the implied warranty of * MERCHANTABILITY or FITNESS FOR A PARTICULAR PURPOSE. See the * GNU General Public License for more details. * * You should have received a copy of the GNU General Public License * along with this program. If not, see http://www.gnu.org/licenses/. * * Version: 1.0 * Design: David Gascón * Implementation: Victor Boria & Luis Miguel Marti */ // Include the SX1272 and SPI library: #include#include "arduPiLoRa.h" int e; char message1 [60]; int ldr; void setup() { // Print a start message printf("SX1272 module and Arduino: receive packets without ACK\n"); // Power ON the module sx1272.ON(); printf("Setting power ON: state "); printf("%d\n",e); // Set transmission mode and print the result e = sx1272.setMode(4); printf("Setting Mode: state "); printf("%d\n",e); // Select frequency channel e = sx1272.setChannel(CH_12_868); printf("Setting Channel: state "); printf("%d\n",e); // Select output power (Max, High or Low) e = sx1272.setPower('H'); printf("Setting Power: state "); printf("%d\n",e); // Set the node address and print the result e = sx1272.setNodeAddress(2); printf("Setting node address: state "); printf("%d\n",e); // Print a success message printf("SX1272 successfully configured\n"); } void loop(void) { ldr = analogRead(1); sprintf(message1, "ldr value: %i \r\n", ldr); e = sx1272.sendPacketTimeout(3, message1); printf(message1, "ldr value: %i \r\n", ldr); printf("Packet sent, state "); printf("%d\n",e); delay(5000); } int main (){ setup(); while(1){ loop(); } return (0); }
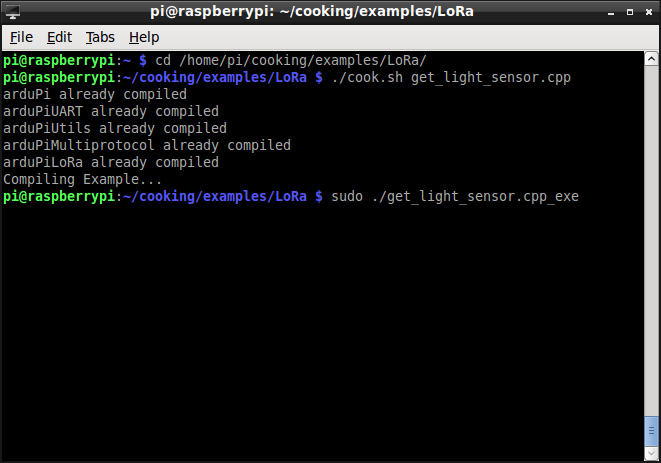
此一程式可以用 cooking/examples/LoRa/cook.sh 進行編譯後執行。
$ cd /home/pi/cooking/examples/LoRa
$ ./cook.sh get_light_sensor.cpp
$ sudo ./get_light_sensor.cpp_exe
一開始光的強度不高時值分別為 820 和 820 和 818。但當我們拿光去照光敏電阻時,值會降低到 580 和 608。
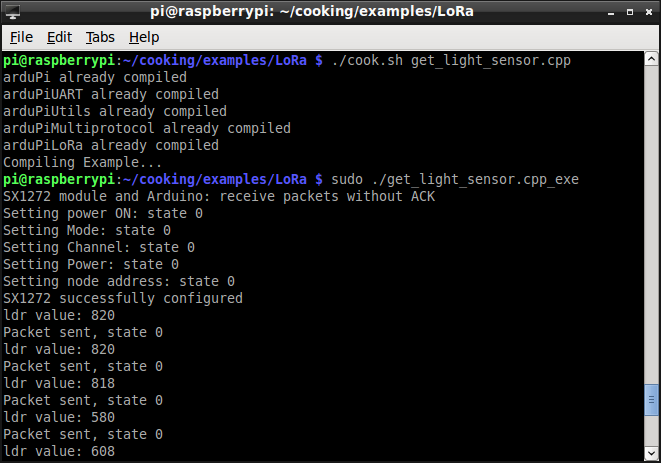
這些值不但會顯示在螢幕,也會透過 LoRa module 傳送到 LoRa Gateway。
結論
根據這次的測試結果,未來如果有多個 LoRa module,將很容易的建構出一個星狀拓撲的 LAN(LoRa Area Network)。這樣低功耗長距離的傳輸協定,可能會大規模的應用在物聯網(IoT)的情境中。
參考資料
- Extreme Range Links: LoRa 868 / 900MHz SX1272 LoRa module for Arduino Waspmote and Raspberry Pi
- LoRa Gateway tutorial
- How to Send Sensor Data Using LoRa Extreme Range Connectivity Kit


發佈留言